
Understanding Vapor Barrier Installation
What is a Vapor Barrier?
A vapor barrier is a material used in construction to help prevent moisture from passing through walls, floors, and ceilings. It acts as a shield, typically made from polyethylene plastic, foil, or similar materials, that reduces the amount of water vapor that can enter or exit a space. In crawl spaces, vapor barriers are crucial for maintaining dryness and preventing moisture-related problems such as mold and wood rot.
Importance of Vapor Barrier Installation
Proper installation of a vapor barrier is essential for several reasons. First, it protects your home’s foundation from moisture intrusion, which can lead to structural damage over time. Second, it enhances energy efficiency by keeping conditioned air inside the home, which helps reduce heating and cooling costs. Finally, a vapor barrier contributes to healthier indoor air quality by minimizing mold growth, pests, and allergens often associated with damp environments. Installing a vapor barrier can significantly improve the longevity and comfort of your home, making it a worthwhile investment for homeowners.
Choosing the Right Materials for Installation
When selecting materials for vapor barrier installation, it’s vital to consider durability, thickness, and permeability. Industry standards recommend using a vapor barrier that is at least 6 mils thick, although a 10 to 20 mil thickness is preferable for crawl spaces. polyethylene sheeting is common for this purpose due to its cost-effectiveness and durability. Additionally, make sure the material is puncture-resistant and UV stable if it will be exposed to sunlight. Look for vapor barriers with a low permeance rating to ensure they effectively prevent moisture migration. Vapor Barrier Installation is often successful when these materials are carefully chosen based on your specific environmental needs.
Preparing for Vapor Barrier Installation
Assessing Your Crawl Space
Before installation, assessing your crawl space is crucial. Check for existing moisture problems, sources of water intrusion, and any signs of mold or wood rot. Look for cracks in the foundation walls, leaks from pipes, or poor drainage outside the home. Take note of the overall condition of the space, including debris and any uneven surfaces. Identifying these issues before beginning the installation can save time and resources, as addressing moisture sources or structural problems is essential for the vapor barrier’s long-term effectiveness.
Cleaning and Preparing the Area
Once you’ve assessed the space, it’s time to clean it thoroughly. Remove any debris, loose soil, or old insulation that may interfere with the vapor barrier’s performance. This includes clearing out any old vapor barrier material that may be torn or ineffective. After clearing the area, ensure the subfloor and foundation walls are dry. If water accumulation is present, it may be necessary to use a dehumidifier or ventilation system to dry out the space adequately.
Needed Tools and Materials
To install a vapor barrier successfully, you’ll need several tools and materials, including:
- Vapor barrier material (at least 6 mils thick)
- Adhesive or tape for securing seams
- Scissors or a utility knife for cutting
- Measuring tape for accurate sizing
- A straight edge for clean cuts
- Protective gear, including gloves and a mask
Having these items on hand will streamline the installation process and ensure you can complete every step effectively.
Step-by-Step Vapor Barrier Installation Process
Measuring and Cutting the Barrier
The first step in the installation process involves measuring the crawl space accurately to determine how much vapor barrier material you’ll need. Begin by measuring the length and width of the crawl space floor and additional vertical surfaces where the barrier will be applied. Once you have these measurements, cut the vapor barrier accordingly, allowing a few extra inches on each side to ensure complete coverage while adjusting for any imperfections in the ground.
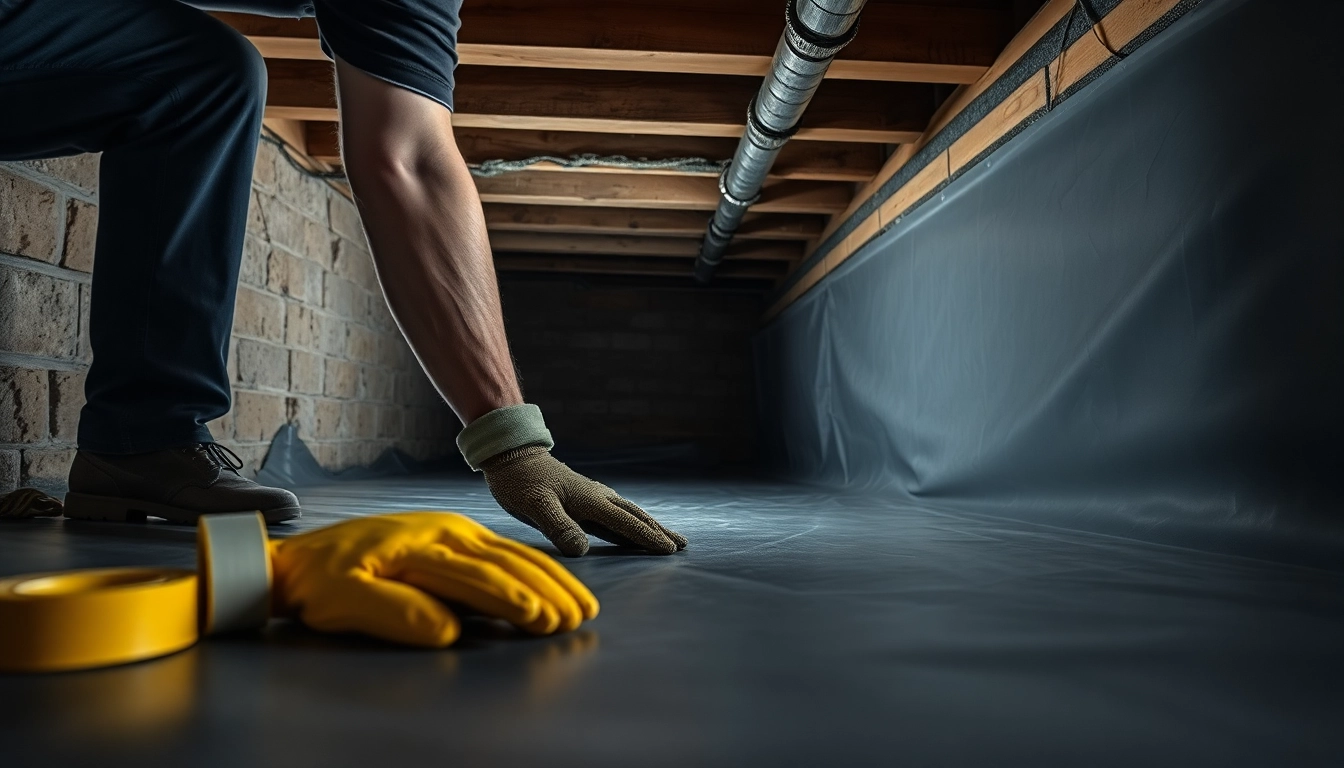
Securing the Vapor Barrier
After cutting the material, lay it over the surface you’ve prepared, ensuring that it overlaps any walls or columns. Begin securing it at the edges using adhesive tape or anchors, firmly pressing the material into place. To help reduce the risk of moisture intrusion through any gaps or holes, ensure you achieve a snug fit against the surfaces. The installation should start in one corner of the space and proceed methodically to prevent overlaps or exposed areas.
Sealing Joints and Edges Effectively
Sealing the joints and edges of the vapor barrier is critical in ensuring its effectiveness. Use appropriate tape or adhesive along all seams, making certain to follow the manufacturer’s instructions for both the vapor barrier and tape/adhesive. Pay particular attention to any corners and transitions to ensure no moisture can sneak through these vulnerable points. After securing all joints, inspect the area thoroughly to confirm a complete seal, and make additional adjustments as needed.
Common Challenges in Vapor Barrier Installation
Dealing with Moisture Issues
One common challenge during installation is addressing existing moisture issues. It is essential to eliminate any sources of moisture before installing the vapor barrier. This could include repairing leaks, improving drainage around the home, or using dehumidifiers. If moisture persists, installing a drainage system or sump pump may be necessary to keep the crawl space dry.
Addressing Uneven Surfaces
Uneven surfaces can hinder the installation and effectiveness of a vapor barrier. If your crawl space floor has significant slopes or protrusions, consider leveling the area using compacted gravel or concrete. A smooth, even surface will allow for more effective installation and reduce the likelihood of wear and tear on the vapor barrier material.
Identifying Potential Hazards
While working in the crawl space, watch for potential hazards such as exposed electrical wires, sharp objects, or pests. Wear protective gear, including gloves and a mask, to ensure your safety. If you encounter any safety concerns that require professional assistance, it’s best to consult with a qualified contractor before proceeding with the installation.
Maintenance and Monitoring After Installation
Regular Inspections and Upkeep
Once the vapor barrier is installed, regular inspections are necessary to ensure it remains intact and effective. Aim to check the vapor barrier at least once a year or after significant weather events, such as heavy rain or flooding. Look for any signs of damage, such as tears, punctures, or signs of moisture infiltration. Early detection of issues can help prevent larger problems down the road.
Knowing When to Replace the Barrier
Even the best-installed vapor barriers may need replacement over time, especially if you notice damage or signs of moisture buildup. Signs that the barrier needs replacing include visible deterioration, mold growth underneath, or penetration of moisture through the barrier. It’s essential to address these issues promptly to maintain a healthy crawl space environment.
Impact on Home Humidity Levels
Properly installed vapor barriers can significantly reduce indoor humidity levels by limiting the entry of moisture from the soil. This can contribute to a more stable and comfortable living environment and minimize energy costs associated with excessive humidity control. Homeowners should monitor their indoor humidity levels and make adjustments as needed, particularly in areas prone to dampness.
FAQs:
1. Why is Vapor Barrier Installation important?
Vapor barriers prevent moisture from damaging your home’s foundation and improve energy efficiency by maintaining indoor climate control.
2. How often should I check my vapor barrier?
Inspect your vapor barrier at least once a year or after heavy rains to ensure it remains intact and effective against moisture.
3. Can I install a vapor barrier myself?
Yes, DIY installation is possible with proper tools and materials, provided you carefully follow guidelines for effective installation.
4. What materials do I need for installation?
You will need vapor barrier sheeting, adhesive or tape for seals, scissors, measuring tape, and protective gear like gloves.
5. What are signs that my vapor barrier needs replacing?
Look for moisture buildup, mold growth, tears or punctures in the material, and any other signs indicating that the barrier is no longer effective.